Module 3 of 8 · A List of Your Own
Module 3 - The page that asks
Read: about 15 minutes · Build: about 90 minutes · Week 3
You have something worth an email address. This week you build the thing that asks for it.
This is the most technical module in the course, and I want to take the fear out of that sentence right away. There's no code. Nothing to install. Nothing to pay for. It's a series of forms and a drag-around editor, and the only reason people get stuck is that they don't know which of the forty menu items to look at.
So this module is mostly a map, followed by a test. The test is the part that matters.
I'm an affiliate for both programs, which I said in Module 1 and will keep saying wherever it comes up. Everything below works on the free account, and this module only uses one of them - Systeme.io. LeadsLeap comes back next week.
What you're building
A capture page. One web page with one job.
It is not a website. It has no menu, no About page, no links to anywhere else, and nothing to click except one button. Every extra thing on it is a door out of the room.
It has four parts, and that's all:
That's it. If you find yourself adding a fifth thing, that's the moment to stop and ask what it's for.
Why the name field comes off
Most templates give you two fields: name and email. I want you to delete the name one, and I want to give you the reasoning rather than a number, because I don't have a number and neither does anyone who quotes you one.
Here's the reasoning. Every field is a small ask, and small asks add up at exactly the moment someone is deciding whether they can be bothered. A name field is worth including only if you're going to use the name. And right now you can't use it well - putting "Hi Margaret!" at the top of an email is the single most recognizable tell of automated marketing, and this audience spots it instantly.
So today it costs you something and returns nothing. Take it off.
One setting, and why it's on
Confirmed opt-in - you'll also see it called double opt-in - means that when somebody enters their address, they aren't on your list yet. They get an email asking them to click a link, and only when they click it are they a real subscriber. It costs you some signups, and the people who stay are the ones who actually wanted to hear from you.
Systeme.io has it, it's off until you switch it on, and this week you switch it on. It's a tick box on your own form, and you'll meet it in step 7 of the build below. You don't have to set up anything to make it work. Systeme.io writes that confirmation email and sends it itself, from the moment you tick the box.
And nobody loses what they came for. Your file sits on the thank you page, and they land there the second they press the button, before any of the confirming happens. Somebody who never clicks the link still walks away with the checklist. What they don't get is your emails, and that's the right way around.
Module 4 goes into what confirming is worth and what it costs you. Today it's one tick, and I'm telling you now so it isn't a surprise when you get there.
One thing that's owed, and where it lives
Commercial email in the United States falls under a law called CAN-SPAM. It requires two things of every email you send: a real physical postal address, and a working way to unsubscribe. Both. Every time.
I'm flagging it here so it isn't a surprise, and then leaving it alone. Nothing you build this week sends anybody a marketing email, so there's nothing to set up today. We do it properly in Module 4, at the point where you write the emails that need it.
The usual worry is that it means putting your home address at the bottom of everything you send. Fair worry, and there are two ways around it - a PO box from the post office, or a mailbox service that gives you a street address for a small annual fee. Both are what plenty of one-person businesses use. What you can't do is leave it out or make one up. Start thinking about which you'll use; you'll need it next week.
Your business email address
Before you send anything, spend five minutes getting a separate email address for this. From here on, it's your business address.
There are two reasons, and the second one will stop you dead if nobody warns you.
The first is the ordinary one. Everything to do with this - the software, the signups, the replies from your subscribers - lands in one place, and it isn't the inbox where your family and your dentist live. That's worth having on day one, and it costs nothing.
The second is the one that catches people out. You can't send marketing email from a Gmail address. Not through Systeme.io, and not through any of the others either. Gmail and Yahoo changed the rules for bulk email in 2024, and sending "from" a gmail.com address through somebody else's software now gets you blocked or filtered nearly everywhere. Every email tool made the same change at the same time. Anybody telling you otherwise is describing how it worked three years ago.
So go to outlook.com and make a free address. Five minutes, no cost. Pick something you'd be comfortable putting on a business card - your name, or what you write about.
Then tell Systeme.io about it. Open Settings, then Emails, and find the verified addresses section. Put your new address in, and Systeme.io sends you an email with a link to click. That's the whole job - and only a verified address can send anything.
While you're on that screen, set the sender name as well. Your real name. It's the first thing anybody sees in their inbox, before they've read a word of the subject line. Both settings then become the default on every email you write from here on.
Do it today rather than leaving it - Module 4 is where you write your first email, and it won't let you save one until a verified address is sitting there.
The address you signed up with back in Module 1 doesn't matter here, so there's nothing to undo. This is a separate setting, and it's the one your emails will send from.
One honest note for later. An address on your own domain - you@yourdomain.com - does this job better. It looks like you, and it lands in inboxes more reliably, because the address belongs to somebody rather than sitting in a pool shared with strangers. A domain runs ten or fifteen dollars a year.
It's more than a swap, though. The address only sends once you've added some records at the company you bought the domain from - miss that and it simply won't verify, which is exactly what happened to me. So it isn't today's job. Start with the free address and get moving, and when you do want a domain, the Resources page walks you through buying it and connecting it, start to finish.
Two words before you start
The editor uses two words constantly, and they confused me for longer than I'd like to admit.
Padding and Margin.
Think of a picture in a frame. The picture is your content - the words, the form, the image. Padding is the space inside the frame, between the picture and the edge. Margin is the space outside the frame, between it and the wall.
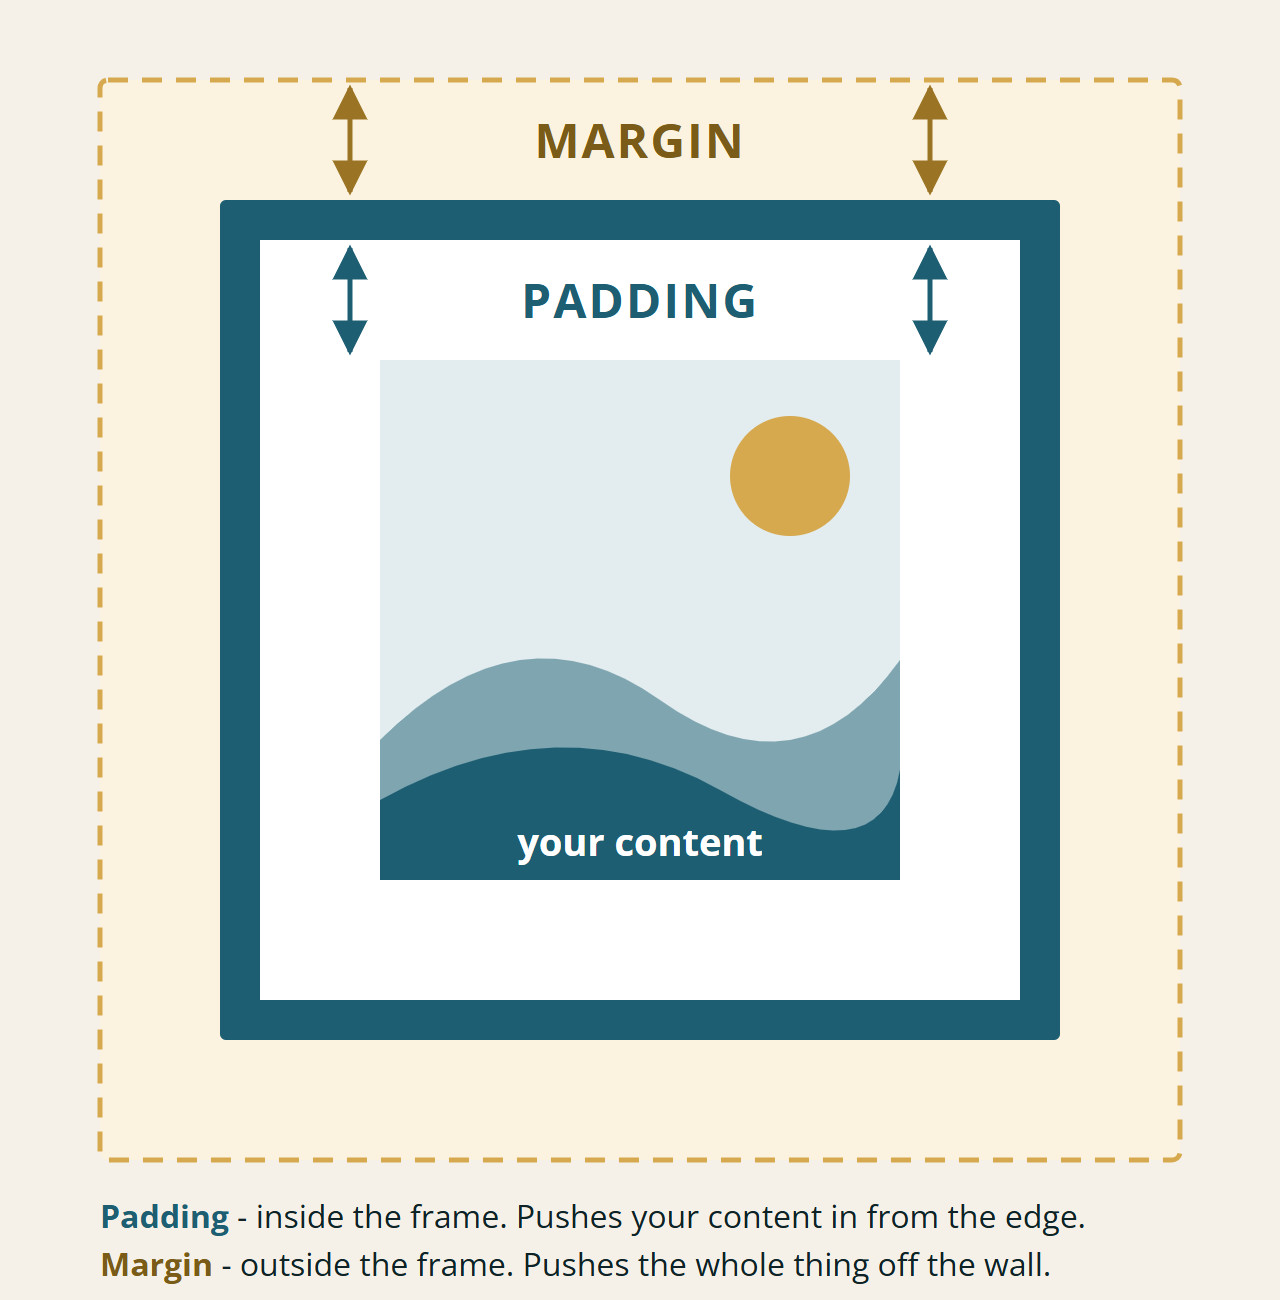
So when something on your page looks cramped, padding pushes it apart from the inside. When two things sit too close together, margin pushes them apart from the outside. That's the whole idea, and it's the answer to most of the "why does this look wrong" moments ahead.
Building the page
Open Sites, then Sales funnels.
As I said earlier, this is the most technical part of the course. There's no way around that, and it isn't your page builder's fault - it would be true in any of them. It's also the only part like this. Take it slowly and it works. But, once you have finished, I hope you will think, "I did it and it really wasn't that hard."
Two ways through this. Build it yourself, which is the steps below. Or start from one of my finished pages, which is further down and skips the building. Either way you end up in the same place, so have a quick look at both before you begin.
One thing to have ready before you start: the PDF you made in Module 2, somewhere you can find it on this computer. You'll upload it near the end, and it's the one part of today you can't do without.
Here's the whole build on video - the page, the thank you page, and the test. It runs about half an hour, because I do it at the speed you'd really do it rather than skipping ahead. The written steps below are the same build, so follow either one, or watch it once and use the writing as your checklist.
1. Click Create. You'll be asked for a name, a domain and a currency. Name it after what your free thing is about - "Beginning gardeners," not "Funnel 1." That's for you, not for anybody else. Leave the domain as the systeme.io one, and ignore the currency; you aren't selling anything.
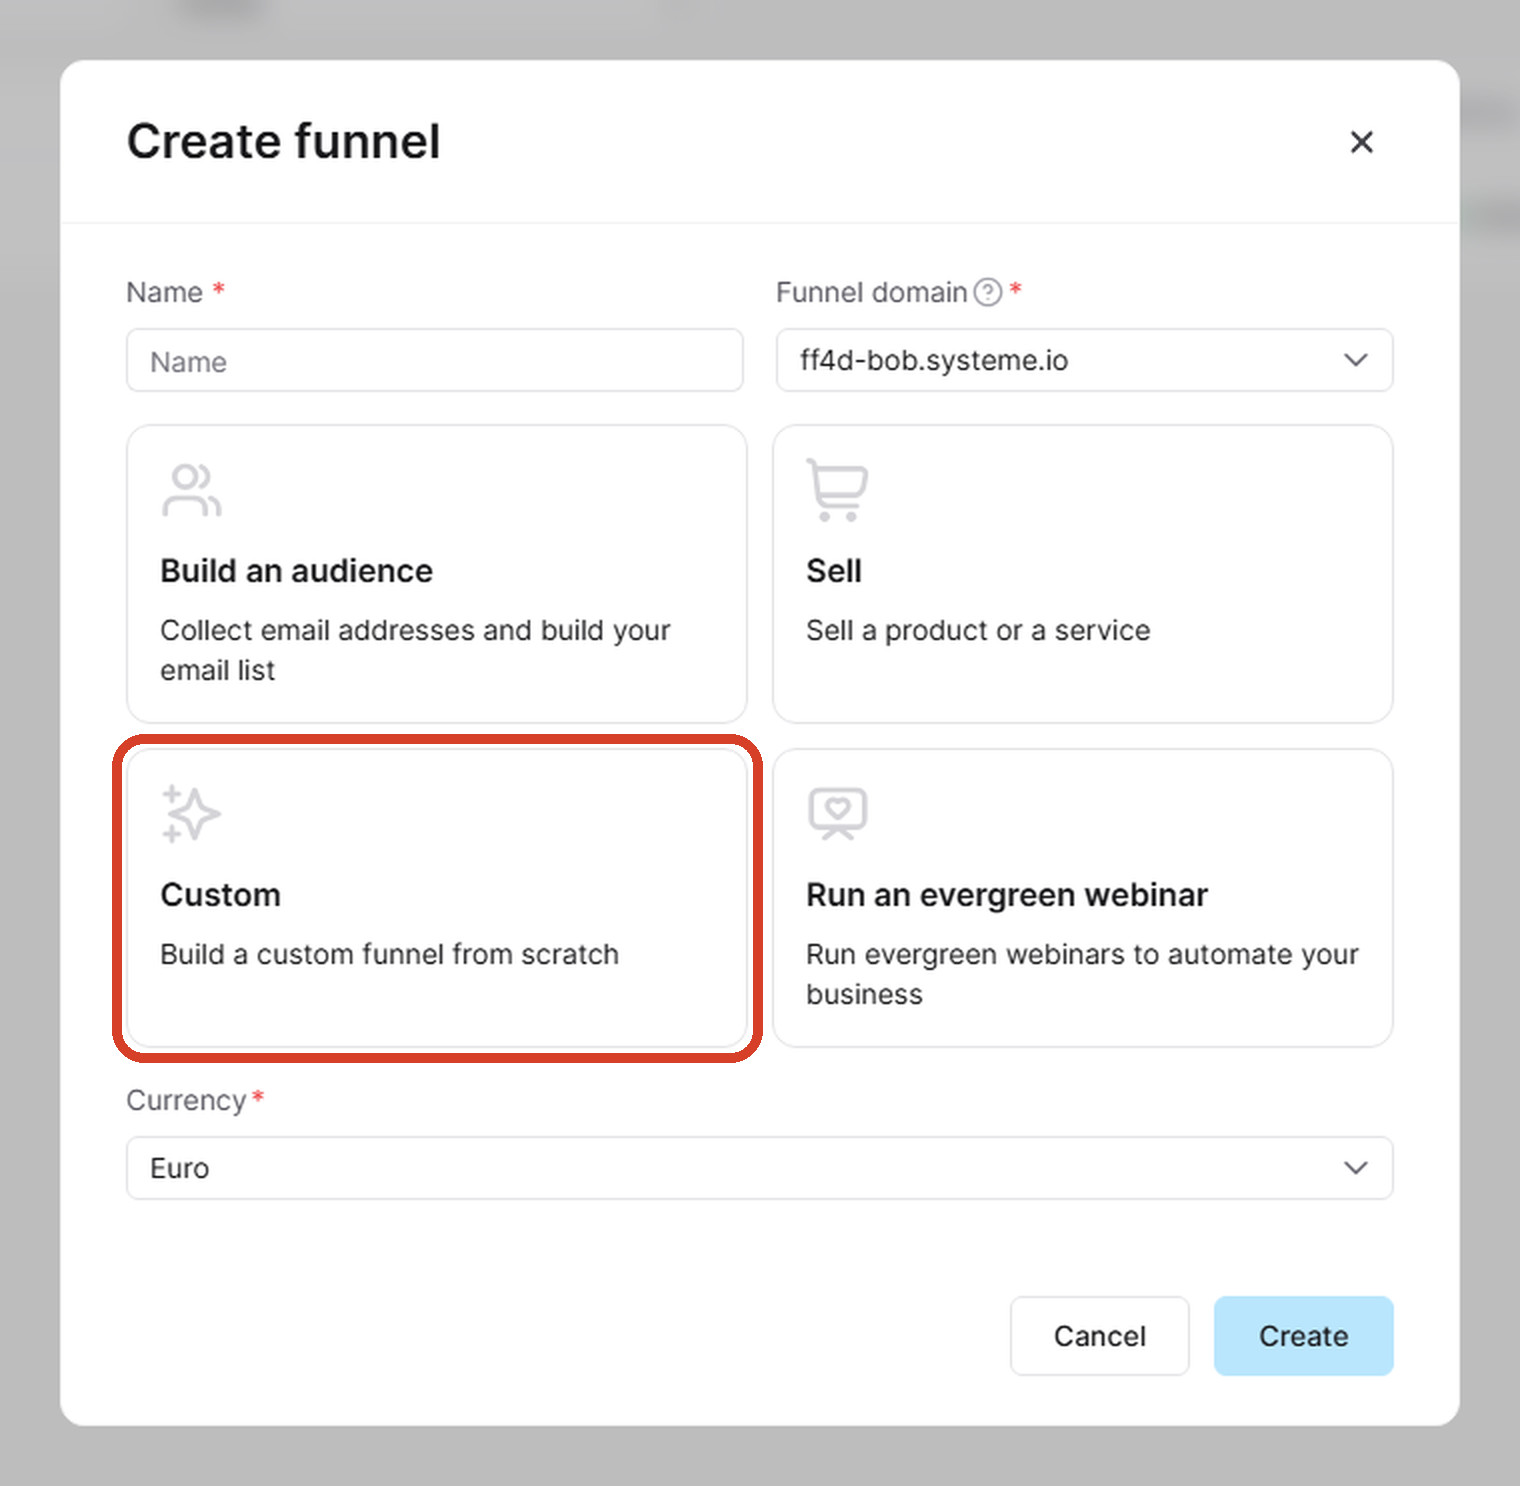
2. Choose Custom, then click creat. The obvious choice is Build an Audience, and I started there. It hands you templates - but they're templates for full websites, not for the one small page you need. You'd spend the next hour deleting somebody else's page. Custom gives you an empty funnel and nothing to undo.
3. Add your first step. The funnel is empty, so click Add step and give it a name - "Opt-in page" is fine. Choose the type: Opt-in page. Now you'll be offered templates again. They're the same ones you just walked past, so don't take one. Choose Start from scratch, save, then click Edit page.
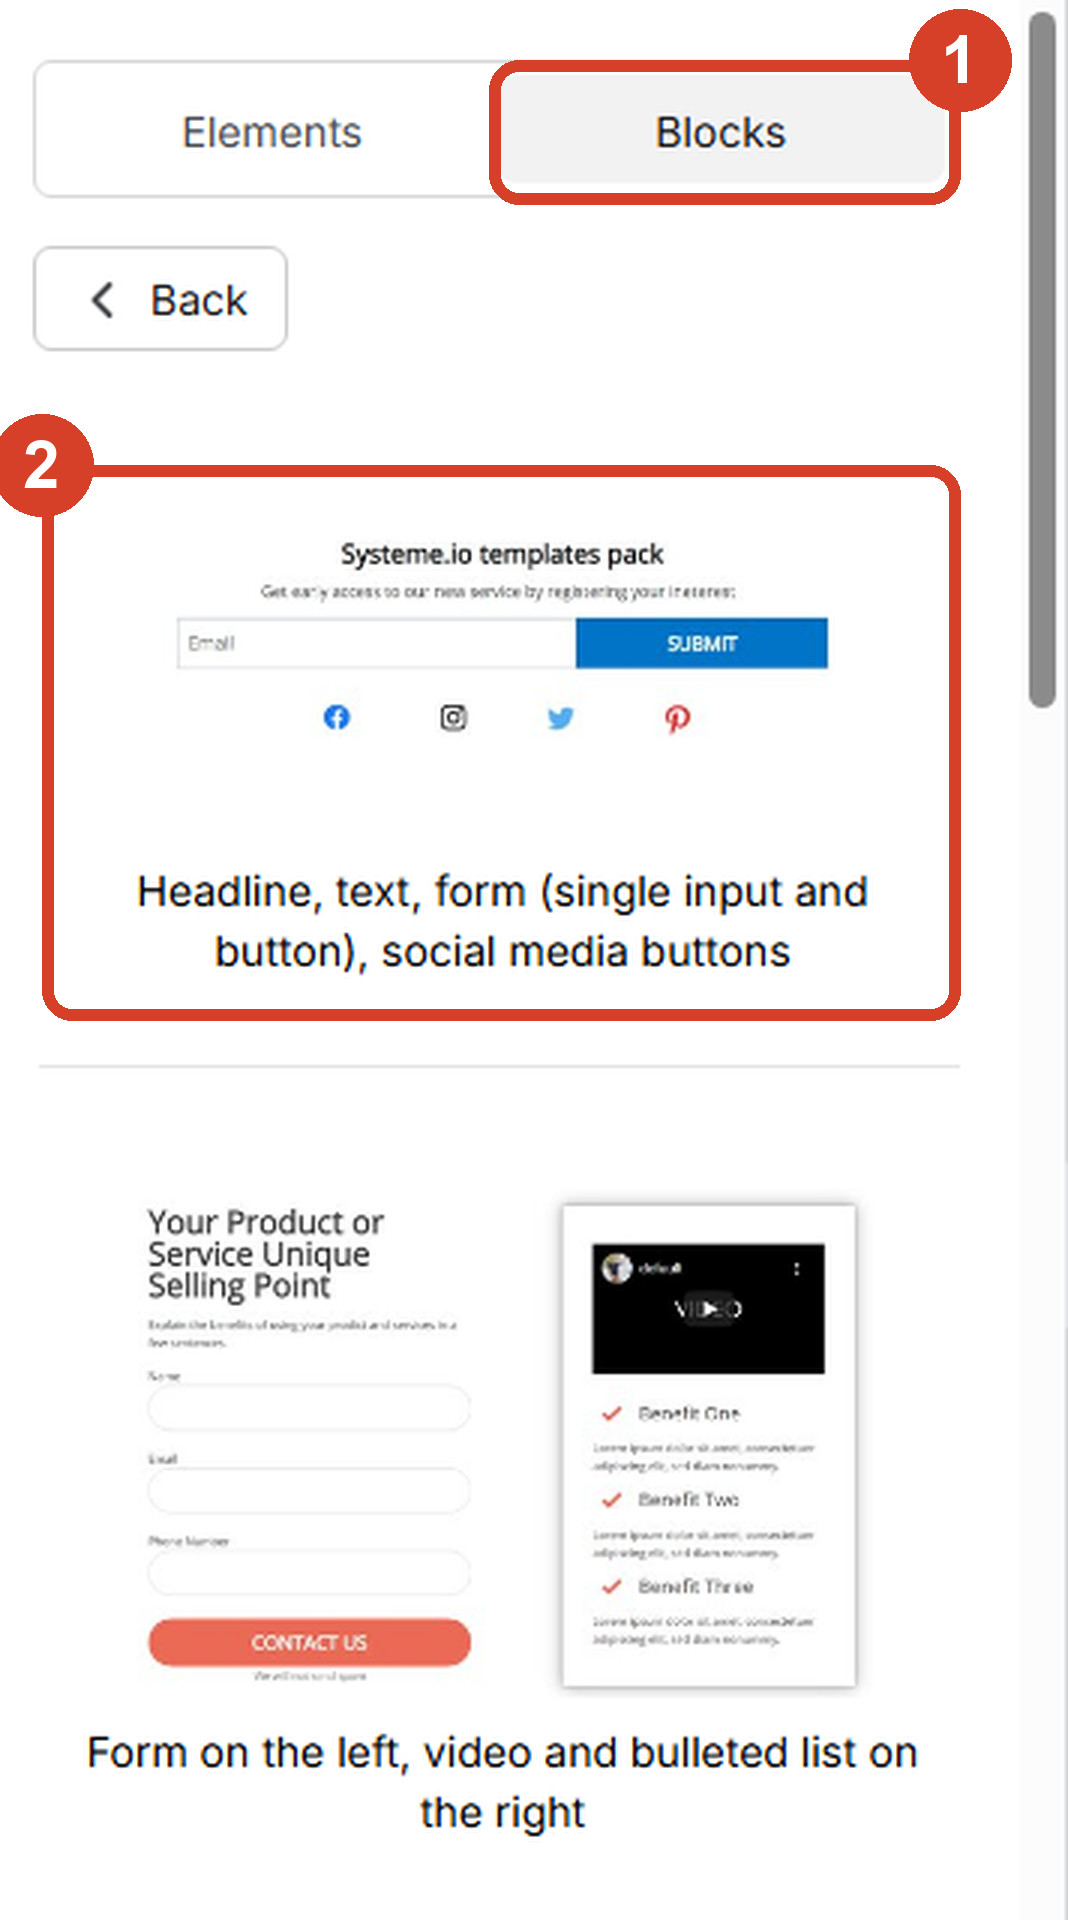
4. Use blocks, not elements. Look at the left side of the editor. Elements are single pieces: a line of text, a headline, an image, a form. Blocks are several elements already arranged together - a small template, in other words, the size of one section instead of a whole page. That's the head start you want. Open Blocks, find the opt-in form group, and pick one that's roughly the shape of what you're after. Don't agonize; you're changing every part of it.
5. Cut the form down. The block you picked probably asks for a name, an email address and a phone number. Every box you ask somebody to fill in is a reason for them to close the tab.Click the phone field and delete it, and delete the little label box that goes with it. Then do the same with the name field - the section above says why. The name field can stay if you'll genuinely use it - change it to first name only if you keep it - but I recommend taking it off.
6. Write the words. Double-click any text to change it. Buttons work slightly differently - click the button, scroll down the settings, and look for Button text. The next section covers what to put in all of it.
7. Tick the double opt-in box. It's in the same button settings panel you just had open - "Do you want to enable double opt-in on this form?" It means people confirm their address before they're really on your list. Module 4 explains what that's worth and what it costs you; today it's one tick.
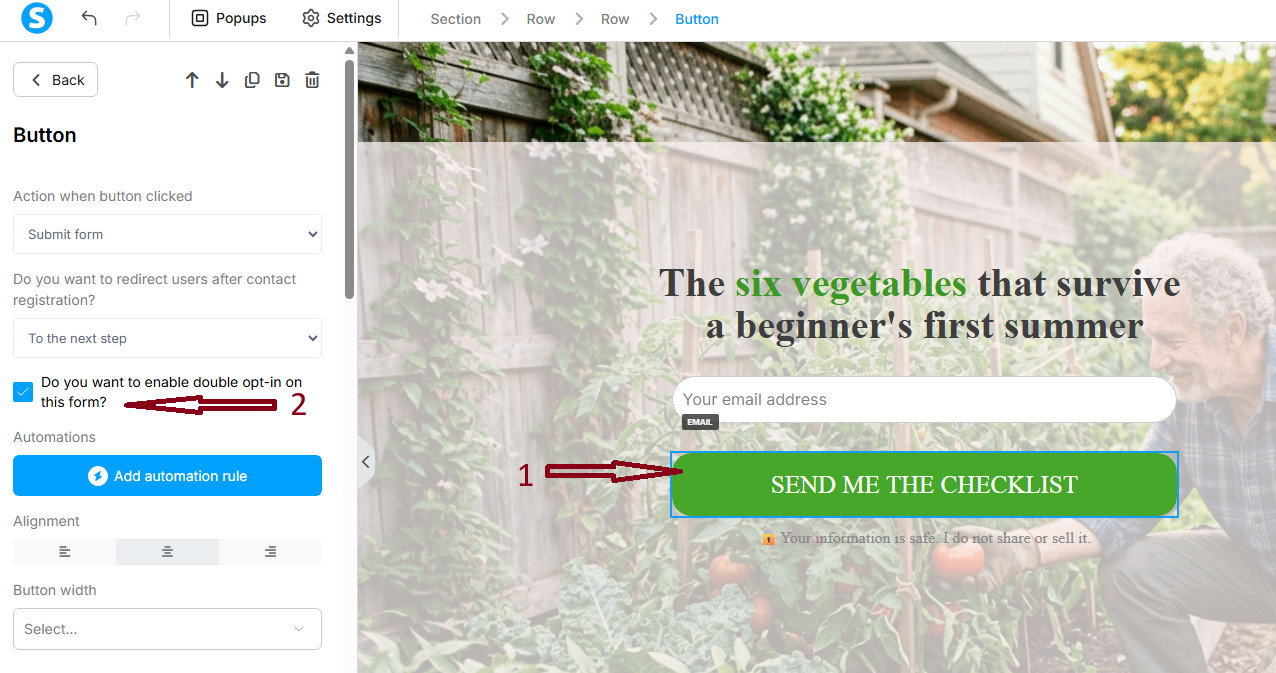
While you're on that screen, look at the setting just above the checkbox - "Do you want to redirect users after contact registration?" It should say To the next step. That's what sends people to your thank you page, and it's how it arrives out of the box. Nothing to change, but now you know where it is if it ever misbehaves.
That's the page. Notice what isn't in that list: there's no step where you connect it to a list, because there's nothing to connect it to yet. Addresses land in Contacts by themselves. In Module 4 you'll write the emails and join them up.
Making it look right
This is where the time goes, and where padding and margin earn their keep. Four things worth knowing before you start, because each one cost me a while to work out.
The gap you're trying to close often isn't on the thing you clicked. Elements sit inside rows, and rows sit inside sections, and any of the three can be holding the space. If you're changing a number and nothing moves, click the row instead of the element.
Padding moves the content inside its box. Margin moves the whole box. So if you're trying to push one line away from the one above it and padding does nothing useful, you want margin.
A background image will tile. It repeats itself across the page like wallpaper until you find the Repeat setting and switch it to fill instead. Free images: Pixabay and Unsplash both have plenty, or make one with ChatGPT the way I did.
Words on top of an image get hard to read. Give the box behind them a background color, then drop the opacity below 100 so the picture still shows through. Readable first, pretty second.
There's a phone icon in the editor. Click it and make sure everything looks good. A lot of your visitors will be on their phone, and a page that looks right on a laptop can fall apart there. What you change in the phone view doesn't affect the desktop view, so fix it properly rather than compromising.
The page after the button
Build an Audience would have handed you two pages. Custom hands you one, so the second one is yours to make. It takes about ten minutes.
Go back to Sites, then Sales funnels, and open the funnel you just built. Click Add step, name it "Thank you page," and choose the type: Thank you page.
This time, take a template. It's worth seeing one now that you know your way around the editor - you'll see right away how much of somebody else's page you'd have been deleting if you'd started that way. Pick one, delete what you don't want, and keep the part that holds a headline and a line or two of text.
You don't have to connect the two pages. They're steps in the same funnel, in order, so the button already knows where to send people.
Now put your file on it. This is where they get the thing - not an email. The emails come in Module 4, and until then this page is the whole of what somebody gets for handing over their address, so it has to hand something back.
This is the moment your file leaves your computer. Module 2 finished with a PDF sitting in a folder somewhere - this is where it goes to live. Systeme.io keeps it from here on, and you won't need to think about where it is again.
Add a button to the page, then click on it. In its settings, find Action, and under that, When button is clicked. A button can do five different things there - the one you want is Download a file.
A small cloud icon appears. Click it, then either drag your PDF into the box or click to upload it from your computer, and press Insert. That's the whole job. Systeme.io keeps the file from here on, so there's nothing else to sign up for and nothing to pay - and when Module 4 sends the same file out by email, you'll pick it off a list instead of uploading it again.
Then say the two things that need saying. Here's the gardening one, so you can see the shape:
Here is your checklist
It's on the button below. Click it and it opens - save it somewhere you'll find it again, or print it and stick it up wherever you keep the seed packets.
One more thing: I've just sent you a short email with a link in it. Click the link today and you're in - that's what lets my Tuesday emails reach you. If you don't see it, have a look in Promotions or Spam.
I'm Bob. I write about growing food in small spaces, mostly because I killed a lot of seedlings learning how. I send one email most Tuesdays - something that worked, or something that didn't - and that's where you'll hear from me next.
The long video was recorded before I worked out the better way to do this. Here's the part that changed - about four and a half minutes. It shows the mechanism; the words for the page are the ones just above.
The quick way: use one of my pages
Systeme.io lets one person hand a finished funnel to another. You open a link, and a copy of the whole thing lands in your account, yours to change.
I've built these for you. Pick the one closest to what you're offering, open the link while you're logged in to Systeme.io, and wait for the confirmation. Then go to Sites, then Sales funnels, and it'll be sitting there with your others.
Don't agonize over which. They do the same job and you're replacing all the words anyway - pick on looks and move on. What lands in your account is a finished funnel with both pages already in it, so there's nothing left to build. Open the opt-in page and go straight to the parts that have to be yours: the name field off unless you are going to use it, and the headline, button and line underneath written in your own words. Then click the button, scroll its settings, and check the double opt-in box is ticked - it's the one setting you can't see by looking at the page. Then put your own file on the thank you page, and test it the same way as everybody else.
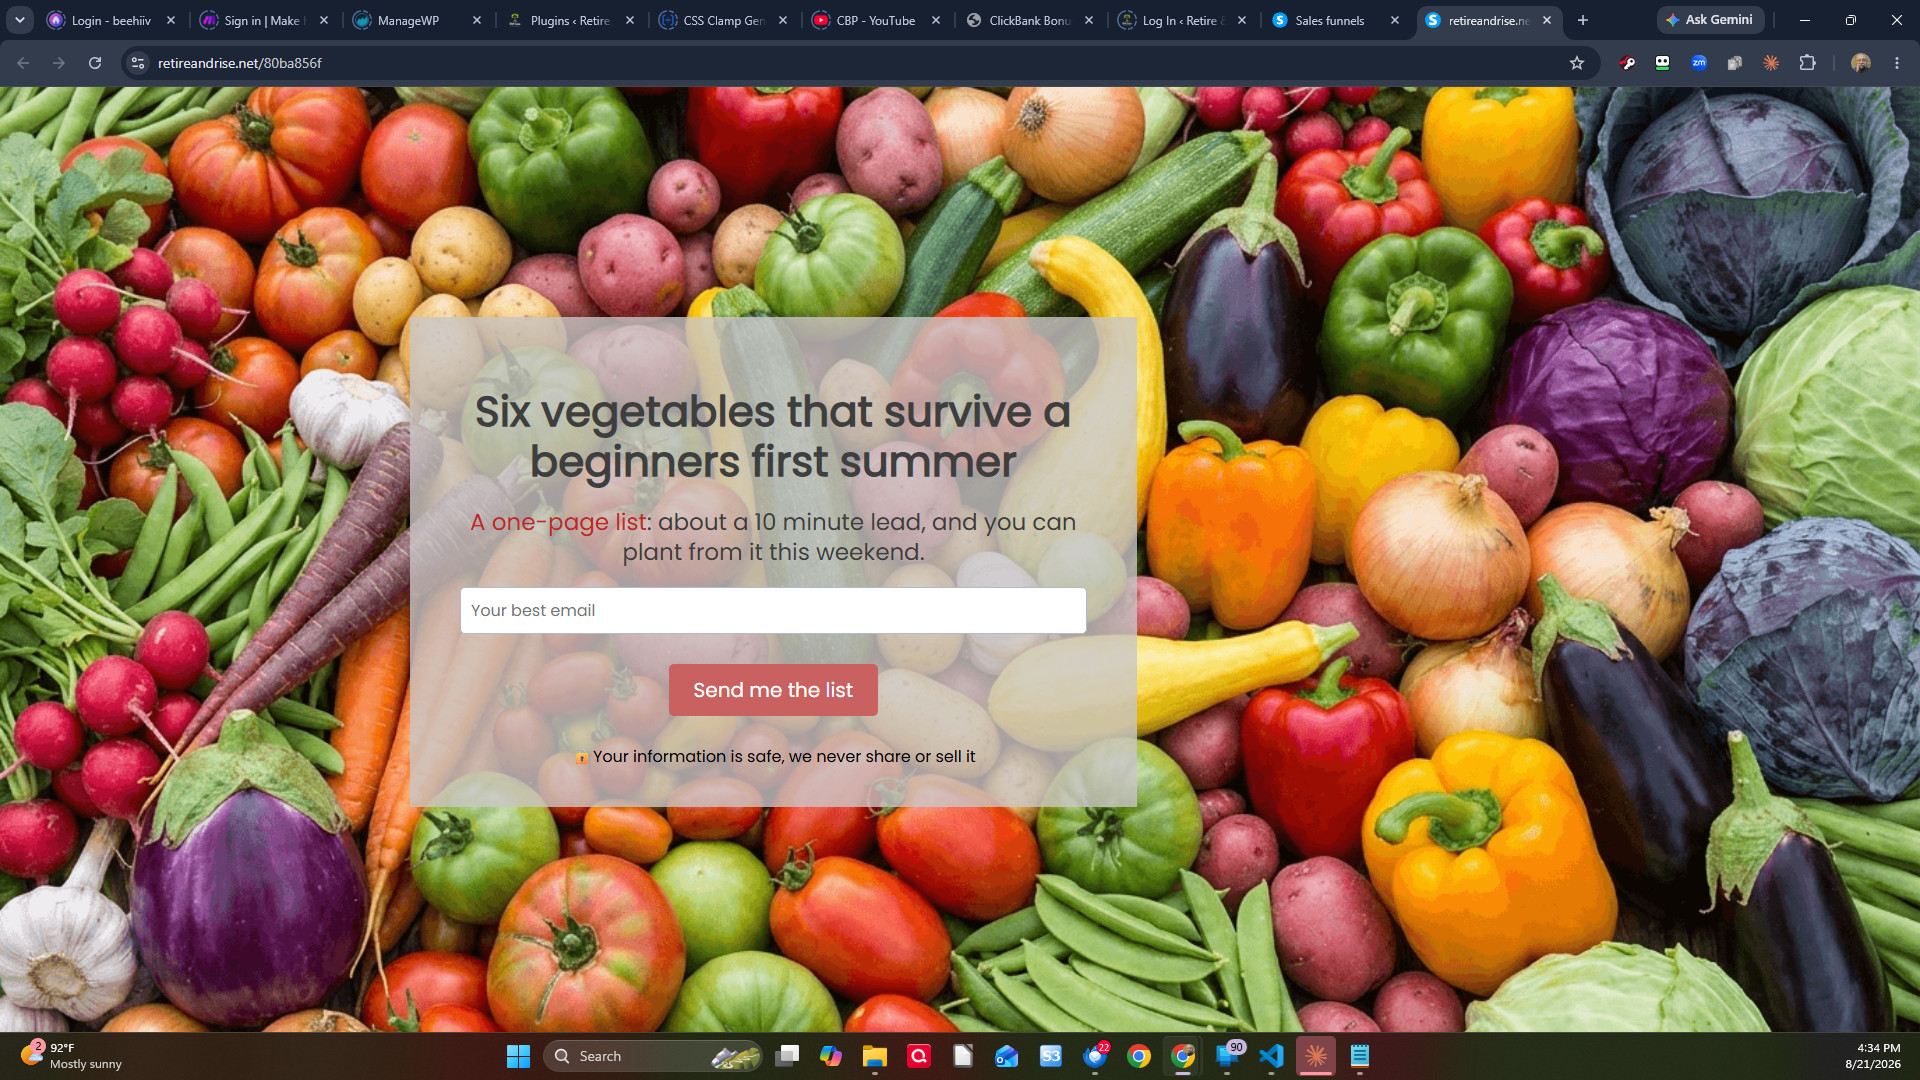
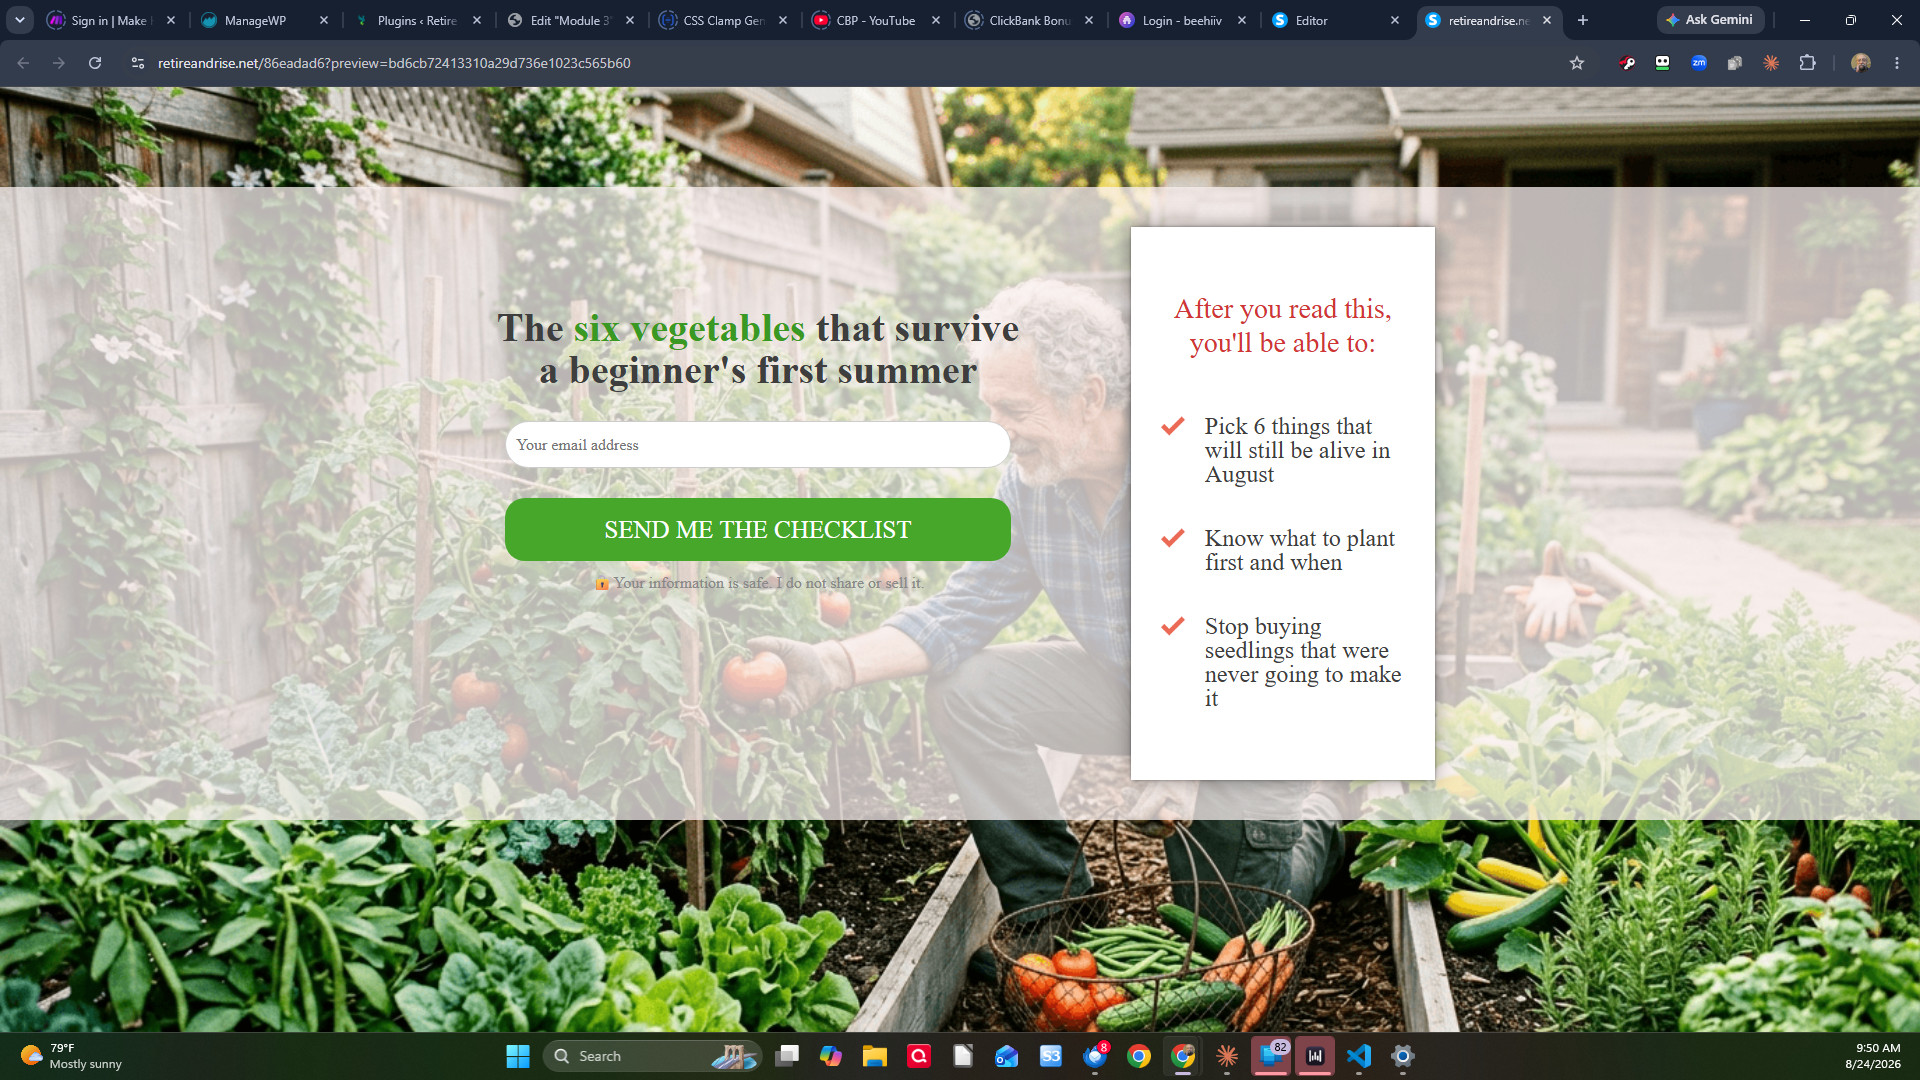
That link is also my affiliate link. Systeme.io builds it in and I can't take it out. Since you already made your account back in Module 1, nothing happens either way - but I'd rather say it than have you find out. I'm also telling you because one day you'll share a funnel of your own, and yours will work exactly the same way.
The words on the page
The page has room for about forty words. Here's where they go.
The headline is the promise. In most cases it's the title of the thing you made in Module 2, or very close to it. You already did this work - don't reinvent it here.
The line underneath says what it is and how big it is. "A one-page checklist. Takes about ten minutes to work through." Naming the size does two jobs: it makes the thing feel finishable, and it's honest about what they're getting.
The button says what happens next. Not "Submit." Not "Sign Up." Something that describes the outcome: Send me the checklist. Send me the list. Yes, email me the plan.
And one line under the button, small: what else they're signing up for. "You'll also get my Tuesday email. Unsubscribe any time, and I don't share your address or sell it." That sentence costs you a few signups and saves you every complaint, and it's the difference between building a list and harvesting one.
What doesn't go on the page: countdown timers, fake scarcity, "limited time only" on something that isn't limited, or any claim about what people earn. Same rules as everywhere else in this course.
Check it on your phone. Most of your visitors will be on one. The editor shows you a desktop view by default, and a page that looks fine there can be a mess on a phone. Look at it on your own before anyone else does.
Now test it, properly
1. Copy your page's address. It's on the funnel step, and you'll want it again next week, so put it somewhere you'll find it.
2. Open it in a private window. Ctrl+Shift+N in Chrome and Edge, Ctrl+Shift+P in Firefox. On a Mac, use Cmd instead of Ctrl (in Safari it's File, then New Private Window). Not the editor preview, and not a tab you're logged in to - you want to arrive at your own page the way a stranger does.
3. Enter your own email address and press the button.
4. You should land on your thank you page. That's the wiring working - the form ran, and the funnel moved you along to the next step by itself.
5. Click your own download button, in that same private window. This is the step people skip and it's the one that breaks. A file that only you can open looks perfect from your side and is a dead end from theirs.
6. Now check your inbox. A confirmation email is waiting, under your own name, and it has a link in it. Click the link. If it isn't in your inbox, look in the spam folder before you assume anything is broken - and if that's where it was, make a note. You'll want to know that about your own emails later.
7. Go to Contacts under CRM and look for the address you just entered. It should be sitting there.

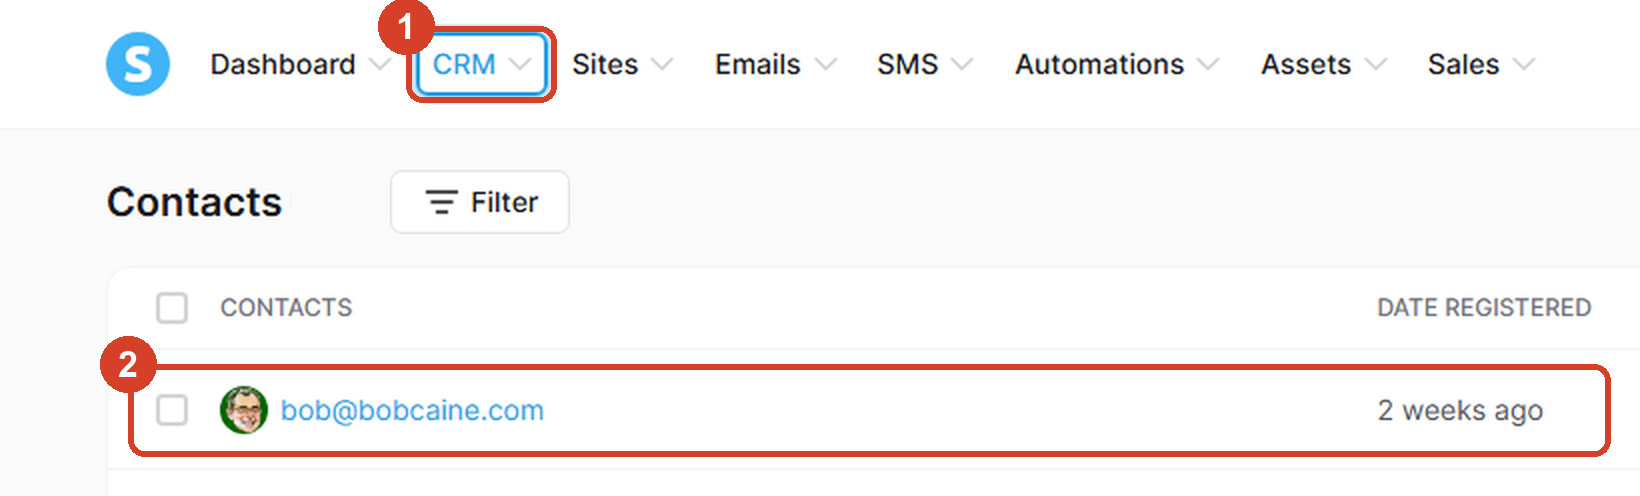
One email arrives today, and only one: that confirmation. It's Systeme.io's, not yours. Nothing you built sends anything yet - that's Module 4, and it's most of the reason Module 4 exists. Today you're testing that the page collects, and this is what collecting looks like.
If the address isn't in Contacts, work through it in this order:
Are you on the live page rather than the editor preview? The preview doesn't submit anything.
Is the page published? Saving and publishing are two different buttons, and I've caught myself out with that one more than once.
Did you actually land on the thank you page? If the button did nothing at all, the form didn't save. Go back into the editor and look at it.
Don't move on until a test address has made it into Contacts and your file has opened from a window you aren't logged in to. Next week sends real people at this page, and somebody who lands on a broken page is gone for good. You get one run at each of them.
What you don't need
A domain name. A logo. A redirect to anywhere other than your thank you page. Images of yourself. A second page for a different audience. A privacy policy page - though a link to one is worth adding when you have it.
All of that is later or never. Today the page works, and "works" is the entire target.
Your build task
Ninety minutes, five steps.
One. Build the funnel. Sites, Sales funnels, Create, then Custom. Add one step, type Opt-in page, and choose Start from scratch. (20 minutes)
Two. Make it yours. Pick a block that's roughly the right shape, take the phone field off - and the name field too, unless you're going to use it - tick the double opt-in box in the button settings, and write the headline, the button and the line underneath. Save. (40 minutes, and most of that is the words)
Three. Add the thank you page, with your file on it. A second step, a short message, and a button that opens the PDF you made in Module 2. (15 minutes)
Four. Test it end to end - your own download button, and the confirmation email in your inbox. The test section above says what to look for. Don't skip it. (15 minutes)
Five. Set up your sending address. A free outlook.com address, verified in Systeme.io under Settings, then Emails, with your real name as the sender. (5 minutes)
Pro Tip
Run your test one more time from your phone with the Wi-Fi switched off. Your home network, your computer and your saved logins can all hide a problem that a stranger on mobile data will hit right away. If it works there, it works.
What happens next
Module 4 is what you say to them. Three emails: the one that hands over what they asked for, which goes out the moment they confirm, the one a couple of days later that gives them a second chance to get it, and a third that tells them who you are.
Right now your page collects addresses and then nothing happens. That's the gap Module 4 closes, and it's worth closing before you send anybody at the page - which is Module 5, and where your first twenty visitors come from.
One last thing before you go. If you finished the page but didn't run the test because it felt like a formality, go and run the test. Of everything in this module, it's the step that saves you the most, and it's the one most often skipped.
Talk soon,
Bob
That's the free three.
You've got something worth an email address, a page that asks for it, and a list ready to catch what arrives. That's a working system. Small, but real - and it cost you nothing.
What's behind the next link is the part that makes it run: what to say to people who have just joined, your first visitors, the sequence that sends itself, how to read your own numbers, and what to do in month three when the novelty has worn off. Modules 4 through 8, plus the Resources page.
That's $17, bought once. No subscription, no upsell, nothing else to buy later. You'll get a password that opens all six pages and keeps working.
If you'd rather stop here, stop here. What you've built is yours and it still works.